Sitemap is one of the main part of every blog. Every blog or website should have a good sitemap not only to map the site. These mapped sitemaps of websites or blogs are also helpful in indexing purposes in the search engines that might be google or Microsoft’s brings or yahoo search engine or else. In the case of blogpost or blogger, you have default sitemaps but whenever you want to add it it’s not so much clear or easy way.
So, you want o modify a sitemap and use a widget that contains the latest article list in published order you can modify some codes and easily do it. you don’t even need the idea of the code. You have to just follow the steps for adding the sitemap Widget.
And this widget is ajax based so there is no slowing of your blog or blogger website. and to be noted that “the widget works on jquery so you have to install jquery plugin if you haven’t installed it yet”
Now let’s go-ahead to know How to Add Sitemap Widget in Blogspot Easily?
Note: Before Editing, we recommend you to make a backup of your template, so that anything goes wrong you still have your original blog design safe
Live Preview
Step 1:Adding CSS to your blog
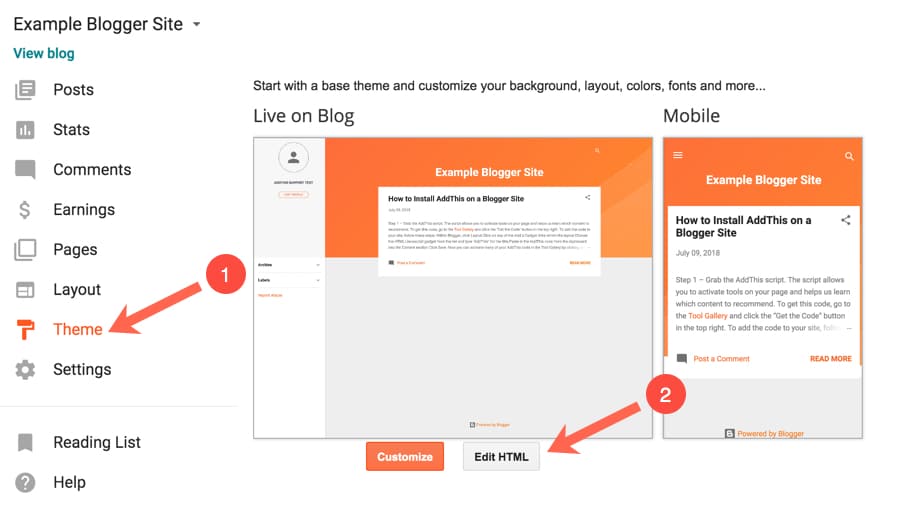
- Get login to your Blog first.
- Then Go to >> Templates >> Edit HTML

-
- search for the ending ]]></b:skin> tag and
- just above it paste the following code.
/* ######## Navigation Menu Css by sorabloggingtips.com ######################### */
.mapasite {
    margin-bottom: 10px;
    background-color: #F8F8F8
}
.mapasite.active .mapa {
    display: block
}
.mapasite .mapa {
    display: none
}
.mapasite h2 {
    background-color: #EEE;
    color: #000;
    font-size: 15px;
    padding: 10px 20px;
    border-radius: 2px;
    margin-bottom: 0;
    cursor: pointer;
    font-weight: 700
}
.mapasite h2 .botao {
    font-size: 18px;
    line-height: 1.2em
}
.botao .fa-minus-circle {
    color: #f30
}
.mapapost {
    overflow: hidden;
    margin-bottom: 20px;
    height: 70px;
    background-color: #FFF
}
.mapa {
    padding: 40px
}
.map-thumb {
    background-color: #F0F0F0;
    padding: 10px;
    display: block;
    width: 65px;
    height: 50px;
    float: left
}
.map-img {
    width: 65px;
    height: 50px;
    overflow: hidden;
    border-radius: 2px
}
.map-thumb a {
    width: 100%;
    height: 100%;
    display: block;
    transition: all .3s ease-out!important;
    -webkit-transition: all .3s ease-out!important;
    -moz-transition: all .3s ease-out!important;
    -o-transition: all .3s ease-out!important
}
.map-thumb a:hover {
    -webkit-transform: scale(1.1) rotate(-1.5deg)!important;
    -moz-transform: scale(1.1) rotate(-1.5deg)!important;
    transform: scale(1.1) rotate(-1.5deg)!important;
    transition: all .3s ease-out!important;
    -webkit-transition: all .3s ease-out!important;
    -moz-transition: all .3s ease-out!important;
    -o-transition: all .3s ease-out!important
}
.mapapost .wrp-titulo {
    padding-top: 10px;
    font-weight: 700;
    font-size: 14px;
    line-height: 1.3em;
    padding-left: 25px;
    padding-right: 10px;
    display: block;
    overflow: hidden;
    margin-bottom: 5px
}
.mapapost .wrp-titulo a {

}
.mapapost .wrp-titulo a:hover {
    color: #f30;
    text-decoration: underline
}
.map-meta {
    display: block;
    float: left;
    overflow: hidden;
    padding-left: 25px;
}
.mapasite h2 .botao {
    float: right
}
Step 2: Adding HTML Script to your website
Now, be careful. this is one of the main part of the tutorial that you have to do it carefully.
- In your template, search for the </body> tag then
- just above it paste the following HTML Code
 <script type='text/javascript'>
            //<![CDATA[
var text_month = [, "Jan", "Feb", "Mar", "Apr", "May", "Jun", "Jul", "Aug", "Sept", "Oct", "Nov", "Dec"];
var no_image_url = "http://1.bp.blogspot.com/-eAeO-DYJDws/Vkqtj4HFBFI/AAAAAAAAB0o/Q5OLsyONXM0/s1600-r/nth.png";

           var static_page_text = $.trim($('.static_page .post-body').text());
if (static_page_text === "[sitemap]") {
    var postbody = $('.static_page .post-body');
    $.ajax({
        url: "/feeds/posts/default?alt=json-in-script",
        type: 'get',
        dataType: "jsonp",
        success: function(dataZ) {
            var blogLabels = [];
            for (var t = 0; t < dataZ.feed.category.length; t++) {
                blogLabels.push(dataZ.feed.category[t].term)
            }
            var blogLabels = blogLabels.join('/');
            postbody.html('<div class="siteLabel"></div>');
            $('.static_page .post-body .siteLabel').text(blogLabels);
            var splabel = $(".siteLabel").text().split("/");
            var splabels = "";
            for (get = 0; get < splabel.length; ++get) {
                splabels += "<span>" + splabel[get] + "</span>"
            }
            $(".siteLabel").html(splabels);
            $('.siteLabel span').each(function() {
                var mapLabel = $(this);
                var mapLabel_text = $(this).text();
                $.ajax({
                    url: "/feeds/posts/default/-/" + mapLabel_text + "?alt=json-in-script",
                    type: 'get',
                    dataType: "jsonp",
                    success: function(data) {
                        var posturl = "";
                        var htmlcode = '<div class="mapa">';
                        for (var i = 0; i < data.feed.entry.length; i++) {
                            for (var j = 0; j < data.feed.entry[i].link.length; j++) {
                                if (data.feed.entry[i].link[j].rel == "alternate") {
                                    posturl = data.feed.entry[i].link[j].href;
                                    break
                                }
                            }
                            var posttitle = data.feed.entry[i].title.$t;
                            var author = data.feed.entry[i].author[0].name.$t;
                            var get_date = data.feed.entry[i].published.$t,
                                year = get_date.substring(0, 4),
                                month = get_date.substring(5, 7),
                                day = get_date.substring(8, 10),
                                date = text_month[parseInt(month, 10)] + ' ' + day + ', ' + year;
                            var tag = data.feed.entry[i].category[0].term;
                            var content = data.feed.entry[i].content.$t;
                            var $content = $('<div>').html(content);
                            var src2 = data.feed.entry[i].media$thumbnail.url;
                            htmlcode += '<div class="mapapost"><div class="map-thumb"><div class="map-img"><a href="' + posturl + '" style="background:url(' + src2 + ') no-repeat center center;background-size: cover"/></div></div><h3 class="wrp-titulo"><a href="' + posturl + '">' + posttitle + '</a></h3><div class="map-meta"><span class="p-author">' + author + '</span><span class="p-date">' + date + '</span></div></div>'
                        }
                        htmlcode += '</div>';
                        mapLabel.replaceWith('<div class="mapasite"><h2>' + mapLabel_text + '<span class="botao"><i class="fa fa-plus-circle"></i></span></h2>' + htmlcode + '</div>');
                        $(document).on('click', '.mapasite h2', function() {
                            $(this).parent('.mapasite').addClass('active');
                            $(this).find('.botao .fa').removeClass('fa-plus-circle').addClass('fa-minus-circle');
                        });
                        $(document).on('click', '.mapasite.active h2', function() {
                            $(this).parent('.mapasite').removeClass('active');
                            $(this).find('.botao .fa').addClass('fa-plus-circle').removeClass('fa-minus-circle');
                        });
                    }
                });
            });
        }
    });
}
            //]]>
</script>
Now Save your template and go to pages to add sitemap.
Step-3 : Add Sitemap In in your Pages
This is also main part of this tutorial need to do it very carefully. Follow the following steps
- Go to your blogger dashboard
- Go to Pages
- Add New Page.
- Add page title and On the new page contains an add this code “[sitemap]” in the page content area. also, you can hide the comments on this page.
- Publish the page by clicking on that.

ITs done and Now you can check for the sitemap by opening the page in a browser


Nice post…to go through
NICE GUIDES. GOOD STEPS AND INFORMATIONS
Thanks for your suggestions and comments. keep on visiting. you are always welcome