If you’re looking to add Google JQuery in Blogger easily, you’ve come to the right place to explore. jQuery is a powerful JavaScript library that simplifies HTML document traversal, event handling, and animation, allowing you to create dynamic elements on your Blogger blogs.
It is not so difficult to just embed jQuery into our blog template. Once you add jQuery to your blog, it will help to save time to develop the website, and it also provides us with many options to make beautiful effects on your website designs. You may not need the Google jQuery CDN for loading these scripts.
Why Use Google’s Hosted jQuery CDN?
Adding Google JQuery in Blogger is not so much of a difficult way for bloggers nowadays. This jQuery library can make different effects, animations, and cool functions for your blog. Many plugins of bloggers are also using jQuery. To add Google JQuery is one of the easiest Google tips for jQuery on your website.
You can download jQuery and host it on Blogger yourself, but that’s not the optimal way. Using Google’s CDN (Content Delivery Network) is the industry standard for a reason. Different libraries can be obtianed from the official Google Hosted Libraries page . Let’s break down why it’s the superior choice for the website masters.
1. Superior Performance and Speed
Google’s CDN is a large network of servers distributed all over the world. When a user visits your blog, the jQuery file is delivered from the server location nearest to them. By this way there will be reducing of the the physical distance the data has to travel, resulting in significantly faster load times compared to serving it from a single location.
2. Smart Browser Caching
This is a huge win for performance. The specific URL for Google’s jQuery (e.g., ajax.googleapis.com) is used by millions of websites. There’s a very high probability that a visitor to your blog has already visited another site that uses this same CDN.
If the file is in their browser cache, their browser doesn’t need to download it again for your site. It loads immediately from their local machine. This can shave valuable milliseconds or even seconds off your page load time.
3. Enhanced Reliability
Google maintains a 99.9%+ uptime for its services. Their infrastructure is designed to handle enormous traffic with built-in redundancy. By relying on their CDN, you ensure that the jQuery library is almost always available, reducing the risk of your blog’s interactive features breaking due to a missing script file.
For example google cdn jquery is one of the mostly used query on it.
4. Built-in Security
Using the official Google CDN link guarantees that you are getting a genuine, unmodified version of jQuery. This eliminates the risk of accidentally hosting a tampered-with file that could contain malicious code.
Note to be considered:
Before inserting the jQuery, you must check if it is already installed in your template or not. You can check in the following way :
” In the HTML editor window in the template, find “https://ajax.googleapis.com/ajax/libs/jquery”. If you didn’t find it, it means that you have to add the code by following the methods. But if you find the code, then you must knowit’ss already added jQuery in your blogger template. Just stop it, no need to continue.
Step-by-Step Guide: How to add jquery to blogger jQuery to Blogger
To add Google jQuery in Blogger easily, you can follow the steps as listed below ;
Step 1: Access Your Blogger HTML Editor
- Go to Theme
- On the Template, click Edit HTML.
- You will be in the Template Editor Window. The picture is shown below.
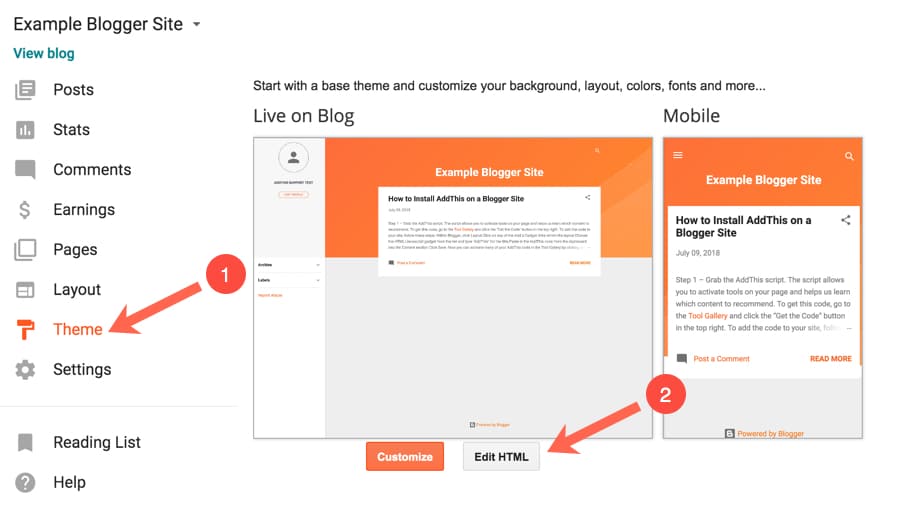 Adding Google JQuery in Blogger Easily
Step 2: Find the </head> Tag
- Search the tag ”
</head>“ - You can use “Ctrl+F” as a shortcut to find the code
Step 3: Paste the Google jQuery Code Snippet
- Now paste the jQuery code snippet (see following) just right above the
</head>tag
<script type="text/javascript" src="https://ajax.googleapis.com/ajax/libs/jquery/1.9.1/jquery.min.js"></script>.Step 4: Save Your Theme
Click “Save” for saving these options
Now jQuery is loaded in the blogger template you are using. you can call different javascript codes in your template easily.
How to Check if jQuery is Loaded Correctly
After following the steps to add jQuery, it’s essential to verify that it’s working properly. A simple mistake can break all your jQuery code. Here are two easy methods to check, from quickest to most detailed.
Method 1: The Quick Console Check (Recommended)
This is the fastest and most reliable way to check.
- Open Your Blog in a new tab. It’s important to view the published site, not just the Blogger editor.
- Open the Developer Tools:
- Windows/Linux: Press
F12orCtrl + Shift + I. - Mac: Press
Cmd + Option + I.
- Windows/Linux: Press
- Click on the “Console” Tab. This is where you can run JavaScript commands directly on your blog.
- Type one of the following commands and press
Enter:Command 1: Check thejQueryobjectjavascriptjQuery- If it’s WORKING: You will see an output similar to
ƒ (e,t){return new we.fn.init(e,t)}. This is the function definition of jQuery, confirming it’s loaded.
$aliasjavascript$- If it’s WORKING: You will see the same function definition as above.
- If it’s WORKING: It will return a version number in quotes, like
"3.6.1".
- If it’s WORKING: You will see an output similar to
✅ Success? If you got any of the results above, congratulations! jQuery is successfully loaded and running on your Blogger blog. You can now start adding your own jQuery scripts.
Method 2: Test with a Simple Script
If you want visual proof, you can add a small test script to your blog.
- In your Blogger dashboard, go to “Layout”.
- Click “Add a Gadget” where you want the test to appear (e.g., the sidebar).
- Choose the “HTML/JavaScript” gadget.
- Paste the following code into the content box:
html
<script>
// Wait for the document to be ready
jQuery(document).ready(function($) {

  // Create a test button
  $('body').prepend('<button id="jquery-test-btn" style="padding: 10px; background: #4CAF50; color: white; border: none; cursor: pointer; margin: 10px;">🎉 jQuery is Working! Click Me!</button>');

  // Add a click event to the button
  $('#jquery-test-btn').click(function() {
    $(this).text('✅ Confirmed! jQuery is loaded correctly!').css('background', '#2196F3');
  });

});
</script>
- Click “Save” and view your blog. You should see a green button at the top of your page. If you can click it and the text changes, jQuery is working perfectly!
Remember to remove this test gadget after you’ve confirmed everything is working.
What If It’s NOT Working? (Troubleshooting)
If you got an error like Uncaught ReferenceError: jQuery is not defined or $ is not defined in the console, it means jQuery failed to load.
- Double-check the code snippet: Go back to your theme HTML and ensure you pasted the correct Google CDN link exactly, with no typos.
- Verify the location: Make sure the script is placed right above the closing
</head>tag. - Check for typos: A single missing character (like a quote or semicolon) can break it.
- Clear your cache: Sometimes your browser loads an old, cached version of your site. Do a hard refresh with
Ctrl + F5(orCmd + Shift + Ron Mac) and check the console again.
By following these steps, you can be 100% confident that jQuery is ready to power your blog’s new dynamic features.
Troubleshooting: Common jQuery Errors in Blogger
If your jQuery code isn’t working, you’re likely encountering one of following common issues. Use this table to quickly diagnose and fix the problem.
| Error Message / Symptom | Cause | Solution |
|---|---|---|
$ is not defined | jQuery library didn’t load, or the $ alias is conflicted. | 1. Check the CDN script is correctly placed above </head>.2. Use jQuery instead of $, or wrap code in: jQuery(document).ready(function($) { // Your code here }); |
jQuery is not defined | The jQuery library itself failed to load. | 1. Verify the CDN URL is correct and has no typos. 2. Ensure you are viewing the published blog, not the Blogger draft editor. |
| Code runs before page loads | Your script executes before the HTML elements it targets exist. | Wrap all your code in a document ready function:jQuery(document).ready(function() { // Your code here }); |
| Script conflicts | Another JavaScript library (like MooTools) is using the $ symbol. | Use jQuery.noConflict(); immediately after loading jQuery, and use jQuery instead of $. |
| Syntax Error in Your Code | A typo or missing character in your custom jQuery script. | Open the browser console (F12) to find the exact error line. Check for missing ), }, ;, or quotes. |
Pro Tip: Always open your browser’s Developer Console (F12) to see the exact error message and line number, which is the fastest way to pinpoint any issue.


Nice